Planning a Christmas holiday trip is exciting, but if you need to renew your passport or those of your kids, it can feel a bit daunting. The good news? Getting ID photos doesn’t have to be a hassle. You have several options, from DIY setups at home to visiting a studio. Here are some easy and practical ways to make ID photos that work, no matter your schedule or preference. Let’s dive in!

Way 1: Make Your ID Photos at Home with Passport Photo Maker
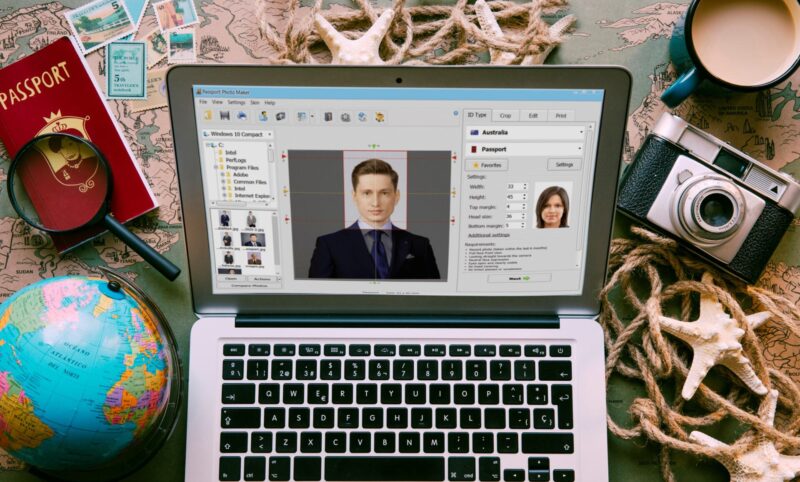
If you’re looking for a flexible and cost-effective at-home option, Passport Photo Maker can be a lifesaver. This software allows you to take and prepare passport photos compliant with all the official requirements from the comfort of your home. It’s particularly useful for busy mums who don’t have time to wrangle the kids into a car, trek to a photo studio, and then wait in line. Follow the link passport-photo-software.com to learn more about the Passport Photo Maker software and to try it for free.
This ID photo maker is really easy to use. All you need to do is to take a photo with your camera, your smartphone or even your webcam, open it in Passport Photo Maker and choose a template for the UK passport, the visa for the country you are planning to visit or any other official document you need to make ID photos for. The software will do the rest by automatically straightening and cropping your photo according to the required format.
Pros:
- Convenient: No need to leave your house, which is perfect if you have young kids.
- Budget-Friendly: Taking photos at home can save you money on studio or booth fees.
- Flexible: You can take as many photos as you need until you get the right one – no rush, no stress.
Cons:
- Camera Quality Matters: For the best results, you’ll need a decent-quality camera. Smartphone cameras can work, but the higher the resolution, the better.
- Printing Required: If you need printed photos, you’ll either need a high-quality printer or will need to take your digital photos to a store for printing.
Way 2: Go to a Professional Photographer in a Photo Studio
Sometimes, you might prefer a more traditional approach. Visiting a professional photographer in a studio ensures that your photos will be of excellent quality and meet all official standards. Studios know the ins and outs of passport photo requirements, so there’s less guesswork for you.
Pros:
- Professional Quality: Photographers use high-end equipment and lighting to ensure the photo is sharp, clear, and passport-ready.
- Guaranteed Compliance: Photographers are familiar with the specific requirements, so they’ll make sure everything is correct, from photo dimensions to background colour.
- Less Hassle: With someone else in control, you don’t have to worry about positioning, lighting, or background issues.
Cons:
- Cost: Professional photos can be more expensive than DIY options or photobooth shots.
- Time-Consuming: If you’re bringing young children, studio visits can become a bit of a marathon. Waiting times and potential meltdowns might not be ideal!

Way 3: Use a Photobooth
For a quick and easy option, popping into a photobooth might be all you need. Photobooths are commonly found in shopping centres, supermarkets, and post offices, making them an accessible choice when you’re out and about.
Pros:
- Quick and Convenient: If you’re already at the supermarket, you can get your photo done while grabbing essentials.
- Affordable: Photobooths are usually cheaper than studio visits, offering a budget-friendly solution.
- Kid-Friendly: Older kids often find the booth experience fun and less intimidating than a studio.
Cons:
- Limited Control: Photobooths don’t offer much flexibility. The setup is fixed, so you can’t adjust the lighting or angle.
- Not Ideal for Young Kids: Getting toddlers to sit still in a small booth can be challenging.
- Quality May Vary: Some booths might not have the best lighting, which can affect the final result.
Tips for Looking Your Best in ID Photos
Now that you know your options, let’s talk about how to look great in your ID photos. Here are some simple tips that can make a big difference:
- Choose Solid Colours: Wear a solid, neutral top (like brown, navy, or grey) that contrasts with the background. Avoid busy patterns and bright colours, as they can be distracting.
- Natural Makeup: A light touch of makeup can help you look fresh without overdoing it. Think neutral tones and avoid anything with too much shine or shimmer, as it might reflect light.
- Tidy Hair: Your hair should be neat and away from your face. If you have bangs, make sure they don’t cover your eyes, as most passport photos require your face to be fully visible.
- Relax Your Expression: While you can’t go full smile for most ID photos, a natural, relaxed look is ideal. Think of something that makes you feel calm to avoid looking too serious or stern.
- Mind Your Posture: Sit or stand up straight, and keep your shoulders relaxed. This can give you a confident yet approachable look in your photo.
Final Thoughts
Whether you go the DIY route choosing an ID photo making software like Passport Photo Maker, head to a studio, or use a photobooth, getting ID photos for you and your kids doesn’t have to be stressful. Consider what’s best for your schedule, budget, and comfort, and choose the option that fits your family best. With a little preparation, your photos will be ready in no time, and you’ll be all set to enjoy your holiday travels!
Safe travels, and happy photo-taking!
Discover more from Hello MrsShilts
Subscribe to get the latest posts sent to your email.