Collaborative Post
Having gained significant popularity over the past few years, diamond painting is a creative hobby that combines two disciplines: paint by numbers and cross-stitch. As a multigenerational activity, you don’t need to have any particular painting skills to delve into this art form. Indeed, regardless of your level, you can create your own diamond painting. Discover how to successfully create a personalised work of art.

Gather the necessary materials for diamond painting
The first step in creating your own personalised diamond painting is to have all the necessary materials for this creative hobby. Note that diamond painting requires very few accessories, so you won’t have to make significant purchases to gather the essentials. To do diamond painting, you’ll need a number of tools.
Tweezers, an essential for diamond painting
Diamond painting is an activity that demands precision and excellent dexterity. It’s important to be able to stick each rhinestone in the required place on the canvas to achieve the desired outcome. To make this task easier, you must use precision tools, hence the importance of using tweezers. It’s generally recommended to opt for curved tweezers to easily move unusually shaped diamonds. Before choosing your tweezers, also make sure they have undergone antistatic treatment. This prevents rhinestones from sticking to them while you work.
Storage box
A storage box is a very practical accessory for holding your rhinestones. It prevents you from losing or scattering them. This box will also be very useful for sorting your diamonds easily, making your diamond painting simpler to accomplish.
Ruler, indispensable in diamond painting
To be as precise as possible while creating your custom diamond painting, you should use a ruler. It will help you align your rhinestones properly. Ideally, choose a transparent 50cm ruler.
Diamond painting kit
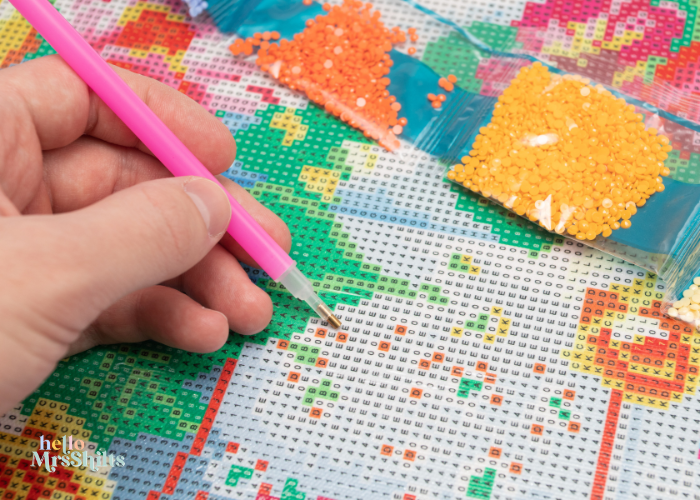
The diamond painting kit is the main element you will need to complete your creation. In general, this kit contains the following accessories:
- an adhesive canvas
- a bag of gems
- a pen or tweezers
- a tray
As it’s a personalised diamond painting, it’s best to order your kit from a specialised website with fast delivery in the UK, so you can have a great customer service experience. You will find a wide range of diamond painting canvases on the market, with various designs including flowers, landscapes, animals, cities, etc. You can even choose your own photos to personalise with diamond painting.

Round or square diamonds
In diamond painting, there are two types of diamonds you can choose to create your work: round diamonds (round drill) and square diamonds (square drill). Round diamonds are particularly easy to handle and are the most recommended model for those new to diamond painting. Round diamonds are easy to pick up and place on the canvas, and they are also known for providing a brilliant effect on large canvases.
However, when it comes to fitting, square diamonds are best for achieving perfect placements. They easily adapt to all types of designs, making them more suitable for creating a personalised work. Your choice will depend on your diamond painting expertise and the type of image you want to reproduce.
How to create your diamond painting?
The actual diamond painting process unfolds over several steps which are described below:
Peel back the protective sheet covering the adhesive canvas
Diamond painting is done on an adhesive canvas on which you place the coloured gems. Before use, the canvas is covered with a white paper serving as protection. Thus, before starting your diamond painting, the first step is to remove this paper to reveal the canvas’s pattern. Generally, it’s recommended to remove part of the paper to begin with, and continue progressively as the work evolves.
Choose a symbol to start
Once your canvas is ready for use, you need to choose a symbol to create your diamond painting. This allows you to stay organised and avoid confusion. Also, consider starting your work at the edges of the canvas to methodically place the diamonds.
Identify the corresponding diamond bag
When facing a diamond painting canvas, each symbol corresponds to a specific diamond colour. To ensure your creation is successful, you need to find the number on the canvas associated with the symbol you want to start with. After finding the number, you must identify the corresponding diamond bag.
Pour the diamonds into the tray
Open your bag of rhinestones and pour them into the tray provided in the diamond painting kit. Be sure to shake the tray well so that the diamonds position themselves properly into the tray. To make the embroidery process easy, do not pour different coloured rhinestones into the tray at the same time.
Prepare your diamond painting pen for placing the diamonds
To place the diamonds precisely on the canvas, use the pen that comes with the diamond painting kit. To use this pen, simply press the tip onto the glue. This facilitates the adherence of the diamonds to the pen tip, allowing you to place your diamonds with maximum precision.
Place the diamonds on your diamond painting
This is the final step in completing your personalised diamond painting. This phase requires a great deal of concentration and time. Each diamond must be positioned in its corresponding place. Your canvas will only be complete once you have finished placing all the diamonds. You can then admire the result of your creation. Your diamond painting will make a gift as delightful as a trendy and original piece of art.
Discover more from Hello MrsShilts
Subscribe to get the latest posts sent to your email.